Ge dect 6.0 Manuel d'utilisateur
Naviguer en ligne ou télécharger Manuel d'utilisateur pour Téléphones Ge dect 6.0. GE dect 6.0 User Manual Manuel d'utilisatio
- Page / 87
- Table des matières
- MARQUE LIVRES
- Model number: 1
- Thank you for choosing GE! 2
- Table of contents 3
- Caller ID 4
- Answering system 4
- Advanced settings 4
- Appendix 4
- moisture 9
- Getting started 10
- THIS END UP 12
- FOR WALL USE 12
- FOR DESK USE 12
- Overview 14
- Initial settings 20
- Telephone operation 20
- originating handset 26
- on the telephone base 27
- Handset settings 31
- Base ringer volume 34
- Base ringer melody 34
- Key tone 34
- Telephone base settings 35
- Block list 36
- Do not disturb 39
- Clock and alarm 41
- Phonebook 46
- SAVE THESE INSTRUCTIONS 76
- Cut along dotted line 86
- ©2011 CCT Tech USA Inc 87
- Distributed in the U.S.A. by 87
- CCT Tech USA Inc 87
Résumé du contenu
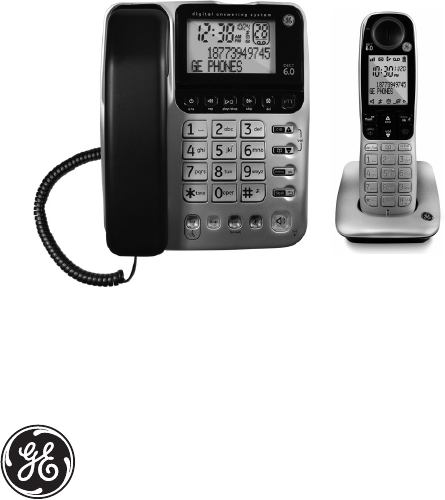
Model number: 30524DECT 6.0 CORDED/CORDLESS TELEPHONE
Getting started6Wall mount installation1. Make sure the telephone line cord is unplugged from the modular jack and the power adapter cord is unplugg
Getting started74. Position the telephone base so the telephone line jack and power jack are facing away from you. Install the convertible base mount
Getting started86. Plug the telephone line cord into the jack on the wall plate. Align the holes on the telephone with the mounting studs of the wall
Getting started9Battery installationCAUTION: 1. Use only the supplied rechargeable battery or equivalent replacement battery. See battery specica
10OverviewTelephone base layout repeatPress to repeat a message, or press twice to play the previous message during message playback. play/stopPress t
Overview11PPTPress to initiate a PPT intercom with system handsets. Telephone base layout #/pause/ringer o• Press and hold to add a dialing pause wh
Overview12Handset layout o/cancel• During a call, press to hang up.• During programming, press to cancel and exit without making changes. CID/volu
Overview13Battery chargingThe following table summarizes the battery charge indicators and what actions need to be taken.Battery indicatorsBattery sta
Overview14Telephone base screen display iconItem Meaning• Flashes when there is a new voice mail message. (Available onl
Overview15Handset screen display iconItem Meaning• Displays when the telephone base is within reception range.• Flashes when the telephone base is o
Thank you for choosing GE! Register your productPlease take a moment to register your product online. Just go to www.gephones.com and click “register
16Initial settingsIn order for your answering system to accurately mark your messages, you must set the time and date. Please see page 37 for Date and
Telephone operation17End a callUsing a cordless handsetPress or place the handset in the charger to end a call.Using the telephone baseReturn the co
Telephone operation18Using the telephone base1. Press .2. Press / to select the desired phone number, then lift the corded handset or press to di
Telephone operation19Delete number from the redial listUsing a cordless handset1. Press redial/format.2. Press or to select the desired phone numb
Telephone operation20Call waiting or call waiting with caller ID serviceTo use call waiting, you must subscribe to call waiting service from your tele
Telephone operation21Voice mail serviceThe icon ashes on the screen of the telephone base and handset(s) when you have received a new voice mail me
Telephone operation22IntercomThe system allows an intercom call between two system devices (either the telephone base or cordless handset).Using a cor
Telephone operation233. To end the intercom call, press or place the cordless handset in the charger. -OR- Return the corded handset to the tele
Telephone operation24To initiate an intercom during a callYou can intercom with another system device (either the telephone base or cordless handset)
Telephone operation25• If your telephone system has more than one handset registered, press / to select the desired handset and then press . The c
Table of contentsGetting startedParts checklist ... 1Telephone jack requirements ...2Instal
Telephone operation26Push to talk (PTT)You can directly broadcast messages to the speakerphone of any registered handset in the system. Using a cordle
27Handset settingsRinger volumeYou can set the handset ringer volume from level 1 to level 5 or turn the ringer o. Using a cordless handset1. Press
Handset settings28Key toneThe handset can be programmed to emit a tone with each key press. You can choose to turn this feature on or o. The default
Handset settings29EqualizerThis feature allows you to change the balance of the audio of the handset to best suit your hearing. Using a cordless hand
30Telephone base settingsBase ringer volumeYou can set the telephone base ringer volume from level 1 to level 5 or turn the ringer o. 1. Press wh
Telephone base settings31Display languageYou can select ENGLISH, ESPAÑOL or FRANCIS as the display language. The default setting is ENGLISH. 1. Pres
32Block listYou can program telephone numbers into the block list so that the telephone silences when a call is received from one of the blocked numbe
Block list33To edit an entryUsing a cordless handset1. Press . 2. Press or to select BLOCK LIST and then press .3. Press or to select the
Block list34To delete entryUsing a cordless handset1. Press . 2. Press or to select BLOCK LIST and then press .3. Press or to select the d
35Do not disturbWhen DO NOT DISTURB (DND) mode is activated, all incoming calls will be silent. This feature only silences the ringer, the incoming nu
To search a phonebook entry alphabetically ... 45Edit a phonebook entry ... 46Delete pho
Do not disturb36Telephone base DNDYou can program the telephone base to silence during the time you set. This setting is independent to cordless hands
37Clock and alarmDate and timeYou can set the date and time of the telephone system as follows.Using a cordless handset1. Press .2. Press or to s
Clock and alarm38Time formatThe display format of time can either be selected as 12 hour or 24 hour. The default setting is 12 hour. To change your se
Clock and alarm393. Press or to select SET FORMAT and then press .4. Press or to select DATE FORMAT and then press .5. Press or to sel
Clock and alarm40 OFF: Turn alarm o (setting completed). ONE TIME: The alarm sounds once at the set time. DAILY: The alarm sounds daily at the set
Clock and alarm41Using the telephone base1. Press when in idle mode. 2. Press / to select CLOCK & ALARM and then press .3. Press / to s
42PhonebookAdd a phonebook recordUsing a cordless handset1. Press .2. Press or to select PHONEBOOK and then press .3. Press twice to select A
Phonebook43Using the telephone base1. Press .2. Press / to select PHONEBOOK and then press .3. Press again to select ADD NEW.4. Enter the name
Phonebook44Character tableUse the dial pad and the chart below to enter a name (up to 14 characters). Each press of a particular key displays the char
Phonebook45To search a phonebook entry alphabeticallyUsing a cordless handset1. Press when the handset is not in use.2. Press or to scroll to an
1Getting startedParts checklistYour telephone contains the following items. Save your sales receipt and original packaging in the event warranty servi
Phonebook46Using the telephone base1. Press twice and the phonebook will display.2. Press / to locate the desired entry.3. Press twice to dial t
Phonebook47Delete phonebook entryUsing a cordless handset1. Press when the handset is not in use.2. Press or to locate the desired entry and the
48Caller IDUsing Caller ID serviceIMPORTANT: To use the Caller-ID capabilities of this telephone system, you must subscribe to Caller-ID services from
Caller ID49redial/format to change the format of the phone number to 555-555-5555, 1-555-555-5555, and back to 555-5555), then press to call.Using t
Caller ID503. Press / to select COPY TO PHBK and then press .4. Enter the name by using the dial pad keys if necessary, and then press .5. Edit
Caller ID51Call log display screen messagesDisplay WhenOUT OF AREA The caller’s name and number are out of area.PRIVATE The caller is blocking the nam
52Answering systemThis section explains how to set up your answering system. Before you begin the setup process, please make sure that the answering s
Answering system53New message indicatorWhen there are new messages on the answering system, the number of new messages and the icon ash, and XX NEW
Answering system54Delete your recorded OGAIf you want to use the pre-recorded outgoing announcement, simply delete your recorded OGA.Using a cordless
Answering system553. Press / to select ANNOUNCEMENT and then press .4. Press again to select PLAY OGA. The system announces the current outgoing a
Getting started2Installing on a desk1. Make sure the wall mounting tab is in DESK position. Use a coin or small at tool to rotate it if needed.Telep
Answering system56Security code for remote accessYour answering system allows you to program a 4-digit security code to get access to the system throu
Answering system575. Use the dial key pad to enter a new 4-digit security code and then press .6. Enter the code again to conrm and then press .U
Answering system58Message playback using the telephone base1. Press on the telephone base to listen to the messages. 2. The system announces the nu
Answering system59Delete all messagesUsing a cordless handset1. Press .2. Press or to select ANS SYSTEM and then press . 3. Press or to sele
Answering system60Access the answering system remotely1. Dial your phone number from any touch-tone telephone.2. Once your answering system takes
61Advanced settingsDialing modeThe default dialing mode is TONE for touch tone dialing. If you have pulse or rotary service, you can change this setti
Advanced settings623. Press or to select AREA CODE and then press .4. Enter your area code and then press to conrm.Using the telephone base1.
Advanced settings634. Press again to conrm.NOTE: All settings under the ANS SYSTEM, BLOCK LIST, PROGRAM DND, CLOCK & ALARM, SETTINGS, HANDSET T
Advanced settings64Deregistering a handsetThis feature is intended for base replacement procedures. Handset deregistration is not recommended for norm
65AppendixTroubleshooting guideIf your telephone system is not operating properly, rst try these general reset procedures:1. Unplug all power adapte
Getting started34. Plug one end of the coiled cord into the jack on the bottom of the telephone base and the other end into the jack at the bottom of
Appendix66Handset does not ring.• The ringer may be o. Increase the ringer volume.• Make sure your handset is charged.You experience audible static
Appendix67Answering systemProblem Cause/solutionThe unit does not record new messages.• Make sure the answering system is on.• The message memory ma
Appendix68General Product Care• Avoid dropping the handset, as well as other rough treatment to the phone.• Clean the phone only with a dry soft clo
Appendix69Important Safety InstructionsSome of the following information may not apply to your particular product; however, when using telephone equip
Appendix7013. Do not expose the product to extreme temperatures such as areas near a hot radiator, stove or in a hot car. Do not place product upon ot
Appendix713. Replace batteries that appear to be swollen or have damaged wiring. 4. Do not dispose of the battery(ies) in re. They may explode. C
Appendix72• Do not burn, disassemble, mutilate, or puncture. Like other batteries of this type, toxic materials could be released which might cause
Appendix73FCC Parts 15, 68 and ACTAThis equipment is in compliance with parts 15 and 68, FCC Rules and Regulations and the Technical Requirements for
Appendix74equipment, operations or procedures where such action is required in the operation of its business and not inconsistent with FCC Rules and R
Appendix75these numbers down so that you can still dial the number manually of the memory dialing fails. This feature is included as a convenience o
Getting started46. Turn the set over and place the handset on the cradle. Plug one end of the telephone line cord into the jack on the back of the te
Appendix76This product meets ENERGY STAR program requirements for energy conservation. Selecting ENERGY STAR products is a responsible way to save ene
Appendix77One Year Limited WarrantyCCT Tech USA Inc. (CCT), the licensed manufacturer of this GE® branded product, warrants this product to the origin
Appendix78• Products that have been repaired, altered or modied by anyone other than CCT or its authorized service representative. • Problems cause
Appendix79Technical specicationRadio frequency band DECT 6.0 (1910MHz to 1920MHz)Telephone base input voltage and current6VDC 500mACharger input volt
Appendix80AAlarm 39, 40Answer a call 16Answering systemturn on or o 52Area code 61BBase ringer melody 30Base ringer volume 30Battery charging
Appendix81MMake a call 16Message capacity 52Message playbackhandset 58telephone base 58Multiple handsets 20Mute 19NNew message indicator 53OOut
Appendix82Remote access operation cardThe remote access card below lists the commands needed to operate your answering system remotely from any touch-
visit our website:www.gephones.com is a trademark of General Electric Company and is under license by CCT Tech USA Inc., Irving, TX 75039©2011 CCT Tec
Getting started5Charger installation (For models with additional handsets)1. Plug the smaller end of the power adapter into the charger. 2. Plug the
Produits connexes et manuels pour Téléphones Ge dect 6.0
 (1 pages)
(29 pages)
(16 pages)
(26 pages)
(16 pages)
(16 pages)
(16 pages)
(35 pages)
(1 pages)
(29 pages)
(16 pages)
(26 pages)
(16 pages)
(16 pages)
(16 pages)
(35 pages)
© 2020, manymanuals.fr. Tous droits réservés | 0.419 s |
 Manymanuals.com
 Manymanuals.de
 Manymanuals.fr
 Manymanuals.it
 Manymanuals.pl
 Manymanuals.cz
 Manymanuals.es
 Manymanuals-pt.com
Commentaires sur ces manuels